My wife is back to attempting to complete the Insanity Workout to get back into shape after giving birth. I'll occasionally join her if I haven't already exercised during my lunch break. Her friend mentioned that there is also an Insanity Asylum workout. I looked that up and saw that an agility ladder is used.
I occasionally play ultimate frisbee, but I suck. I'm not fast and need to work on speed. The agility ladder would be a great help to increase speed. I like to make things and need to sprint faster so a DIY agility ladder just makes sense.
Cost wise, I think its cheaper to make one depending on the materials you use. There are many tutorials out there that use a variety of materials (duct tape, pvc pipes, and rope just to name a few). Here is my take on a DIY agility ladder.

Project: Agility Ladders (His & Hers)
Project Time: About 2 hours
Material Cost: Around $25
Easy to make agility ladder using PVC lattices, rope, and plastic tie straps. These instructions are for two ladders as one will be for my wife (left overs could be used to make a kiddie sized agility ladder). You can easily adjust the length and width to fit your needs.
Disclaimer: I take no responsibility if your agility ladder fails to do its job or if you get hurt making it or hurt using it. I am writing this because seems like every project has a disclaimer because someone somehow screws up.

The following items may be found at Home Depot .
PVC Lattice 1-1/4" x 5/32" x 8' (3 pieces)
Rope 3/8" (at least 42')
Plastic Cable Ties 8" (at least 48)
Masking tape
Cut the lattices into 20" pieces. You should have four pieces per 8' lattice with a short left over piece (the left overs can be cut in half and used to make a kiddie sized agility ladder). After cutting the lattices, you will end up with twelve 20" pieces. Each ladder will use six pieces.

You will need to drill four 3/16 holes at each end of each lattice. To make this easier, use one lattice piece as a template. Mark the drill points at the locations as specified in the picture.

Drill 5/64" holes at each location. Use this first piece as the template to easily mark the other pieces. Then drill 5/64" pilot holes in each piece.

Then widen up on each hole to 3/16".
Mark the halfway height (skinny ways) of each lattice on each end. Starting on one side, attach a lattice at every 18" of the rope with two cable ties as shown below (baby was the supervisor at that time day). Try not to stretch the rope too much when measuring out 18". I left 18" lead and tail of rope. This is so that I can permanently lengthen the ladder in the future if needed.


I found it easiest to place the left cable tie (open) first in each lattice. Then I would hold one end of the rope with my left hand, run the rope across the tape measure with my right hand to the next 18" spot. To mark the spot, I just pinch the spot with my fingers. I then would line up my pinch with the halfway mark on the lattice. Using my left hand I would close the cable tie. Then tighten the cable tie using a combination of my left hand and mouth while I keep my pinch lined up with the halfway mark. Finally, put in the right cable tie and tighten down.
Use the masking tape to keep the rope together when cutting. Then use a lighter to burn the end to keep the rope end from fraying.
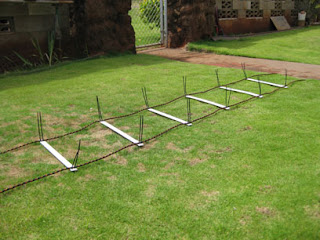
Attach rope on the opposite side using the same procedure. Then go over each cable tie and make sure the tie is on tight with small pliers. Here is the ladder before the excess cable tie is cut off with a wire cutter.
And finally both ladders with the excess cable tie cut off. I got approval from my daughter (she took over supervisor duties from baby).

I was able to cut the left over lattice pieces into six 8-1/2" pieces. Just enough to make a kiddie sized agility ladder. To give more space in the rungs, I moved the rope to just a little over 1/2" from the edge. My eldest daughter is too small to do agility drills (let alone follow directions to do the drills), but she likes it because it is hers.

My eldest lost a baby crawling contest because she wasn't fast enough. Well, I'm making sure my youngest wins her competition. I'm incorporating the ladder to crawling agility drills. She'll win for sure. :P

Thanks for looking.
I occasionally play ultimate frisbee, but I suck. I'm not fast and need to work on speed. The agility ladder would be a great help to increase speed. I like to make things and need to sprint faster so a DIY agility ladder just makes sense.
Cost wise, I think its cheaper to make one depending on the materials you use. There are many tutorials out there that use a variety of materials (duct tape, pvc pipes, and rope just to name a few). Here is my take on a DIY agility ladder.
Table of Contents
- Summary
- Getting Ready
- Materials
- Tools
- Lattice Cutting
- Hole Drilling
- Assembly
- Extra
Summary

Project: Agility Ladders (His & Hers)
Project Time: About 2 hours
Material Cost: Around $25
Easy to make agility ladder using PVC lattices, rope, and plastic tie straps. These instructions are for two ladders as one will be for my wife (left overs could be used to make a kiddie sized agility ladder). You can easily adjust the length and width to fit your needs.
Disclaimer: I take no responsibility if your agility ladder fails to do its job or if you get hurt making it or hurt using it. I am writing this because seems like every project has a disclaimer because someone somehow screws up.
Getting Ready
Materials

The following items may be found at Home Depot .
PVC Lattice 1-1/4" x 5/32" x 8' (3 pieces)
Rope 3/8" (at least 42')
Plastic Cable Ties 8" (at least 48)
Masking tape
Tools
- Pencil
- Measuring Tape
- Combination Square
- Saw
- Drill
- Drill Bits 5/64", 3/16"
- Scissors
- Lighter
- Small Pliers
- Wire Cutter
Lattice Cutting
Cut the lattices into 20" pieces. You should have four pieces per 8' lattice with a short left over piece (the left overs can be cut in half and used to make a kiddie sized agility ladder). After cutting the lattices, you will end up with twelve 20" pieces. Each ladder will use six pieces.

Hole Drilling
You will need to drill four 3/16 holes at each end of each lattice. To make this easier, use one lattice piece as a template. Mark the drill points at the locations as specified in the picture.

Drill 5/64" holes at each location. Use this first piece as the template to easily mark the other pieces. Then drill 5/64" pilot holes in each piece.

Then widen up on each hole to 3/16".
Assembly
Mark the halfway height (skinny ways) of each lattice on each end. Starting on one side, attach a lattice at every 18" of the rope with two cable ties as shown below (baby was the supervisor at that time day). Try not to stretch the rope too much when measuring out 18". I left 18" lead and tail of rope. This is so that I can permanently lengthen the ladder in the future if needed.


I found it easiest to place the left cable tie (open) first in each lattice. Then I would hold one end of the rope with my left hand, run the rope across the tape measure with my right hand to the next 18" spot. To mark the spot, I just pinch the spot with my fingers. I then would line up my pinch with the halfway mark on the lattice. Using my left hand I would close the cable tie. Then tighten the cable tie using a combination of my left hand and mouth while I keep my pinch lined up with the halfway mark. Finally, put in the right cable tie and tighten down.
Use the masking tape to keep the rope together when cutting. Then use a lighter to burn the end to keep the rope end from fraying.
Attach rope on the opposite side using the same procedure. Then go over each cable tie and make sure the tie is on tight with small pliers. Here is the ladder before the excess cable tie is cut off with a wire cutter.

And finally both ladders with the excess cable tie cut off. I got approval from my daughter (she took over supervisor duties from baby).

Extra
I was able to cut the left over lattice pieces into six 8-1/2" pieces. Just enough to make a kiddie sized agility ladder. To give more space in the rungs, I moved the rope to just a little over 1/2" from the edge. My eldest daughter is too small to do agility drills (let alone follow directions to do the drills), but she likes it because it is hers.

My eldest lost a baby crawling contest because she wasn't fast enough. Well, I'm making sure my youngest wins her competition. I'm incorporating the ladder to crawling agility drills. She'll win for sure. :P

Thanks for looking.
Comments