My friend, Ross, wanted to fix his fishing pole guides but did not have all the necessary equipment. Luckily, he had a friend that had rod building equipment. I had mentioned to my friend that one day I would like to wrap a custom pole. So my friend said hey look at the stuff you would need. The most expensive piece of equipment was the rod dryer. His friend's dryer was retail bought at some online fishing store, I want to say Cabela's but I am unsure of that. The dryers can be pricey. So my friend and I looked up cheap DIY alternatives. We found many and the concept was the same. Slow rotating motor with a cup to hold the end of the rod. Here is our take on a dryer. Some of the parts to make this was given to me by Ross, thanks dude.


Project: Fishing Pole/Rod Dryer
Project Time: About 1 hour
Material Cost: Around $5 (almost everything is scraps or salvaged)
Easy to make fishing pole/rod dryer. The dryer can be as cheap or expensive as you want it to be. This dryer was made for my cousin Jeff on Maui so I took the cheap fast build route. Sorry Jeff, I would have made it a bit nicer if I had more time before my next visit to Maui.
Disclaimer: I take no responsibility if get hurt making the dryer or hurt using it. I am writing this because seems like every project has a disclaimer because someone somehow screws up.

Most of the hardware items may be found at Home Depot, Lowes, or your favorite local hardware store. The motor and power cord were taken from an old thrown out microwave.
Low RPM 120V A/C motor (found in Microwaves)
Power cord (take from Microwave that you get the motor from)
PVC pipe end cap (1 1/2")
Plastic Spacer Tube (inner diameter just a bit smaller than the size of the shaft on the motor)
Bolt (that can be screwed into the spacer)
Small set screw
#10 Bolts and nuts (4)
#6 Bolts and nuts (2)
Tie wraps
Wood
Rubber bands
Rubber feet
Here is picture of the set screw if its called something else. I just happen to call it a set screw, not sure if that is its actual name at time of writing this. The set screw is tiny and requires the use of a 1/16" hex wrench to screw it.


First, sand or file 1/4 to 1/2 the thickness of spacer on one side flat. This is to make the spacer easier to hold in a clamp and makes drilling the set screw hole much easier. Don't sand too much off, you want a good amount of material to hold the set screw in place.
The inner diameter of the spacer was a tad bit too small for the shaft on the motor. That was good because the spacer could be drilled to the correct size for a nice snug fit.
Mark where the set screw would be touching the middle of the shaft and drill a hole for it on the flat portion of the spacer.
Cut the spacer to size if it is long. The spacer was cut to the length of the motor shaft plus the length of the bolt.
The bolt to hold the mount to the rod chuck will tread into the opposite side of the set screw. The bolt I had to hold the rod chuck was a tad bit bigger than the spacer's inner diameter. I had to drill out a small portion before I could tread the bolt in.
Here is the rod chuck mount attachement with the bolt slightly screwed in.

The premise for this rod chuck is that you use rubber bands stretched across the bolts. The bands cross each other and form a nice little tic-tac-toe in the center. The rod then suspends nicely in the center square. The rubber bands provide enough clamping pressure to turn the rod as the motor turns.

Basically drill 4 holes equidistance from eachother on the side of a PVC pipe end cap.
Secure the #10 bolts in those holes with the head of the bolts inside the cap as shown in the picture.
Drill a hole in the center that will be used to attach the rod chuck to the rod chuck mount.
Here is a picture of the rod chuck with the mount attached.

I had to add rubber feet because of the way I attached the power cord. The tie wraps created an uneven surface below. This was still a cheap route for me as I have a bunch of those stick-on rubber feet laying around.


The power cord was also salvaged from the same microwave that I got the motor from. The power cord already had terminals that fit nicely on the motor. The power cord also had a grounding wire that I just hooked up to the case of the motor. Probably not needed but it makes the dryer look a bit more safer.


And a quick boring
video of the dryer working. Sorry not an in action video since I am not currently wrapping a fishing pole/rod. Table of Contents
- Summary
- Getting Ready
- Materials
- Tools
- Rod Chuck Mount
- Rod Chuck
- Base
- Wiring
- Final Assembly
- Future Notes
Summary

Project: Fishing Pole/Rod Dryer
Project Time: About 1 hour
Material Cost: Around $5 (almost everything is scraps or salvaged)
Easy to make fishing pole/rod dryer. The dryer can be as cheap or expensive as you want it to be. This dryer was made for my cousin Jeff on Maui so I took the cheap fast build route. Sorry Jeff, I would have made it a bit nicer if I had more time before my next visit to Maui.
Disclaimer: I take no responsibility if get hurt making the dryer or hurt using it. I am writing this because seems like every project has a disclaimer because someone somehow screws up.
Getting Ready
Materials

Most of the hardware items may be found at Home Depot, Lowes, or your favorite local hardware store. The motor and power cord were taken from an old thrown out microwave.
Low RPM 120V A/C motor (found in Microwaves)
Power cord (take from Microwave that you get the motor from)
PVC pipe end cap (1 1/2")
Plastic Spacer Tube (inner diameter just a bit smaller than the size of the shaft on the motor)
Bolt (that can be screwed into the spacer)
Small set screw
#10 Bolts and nuts (4)
#6 Bolts and nuts (2)
Tie wraps
Wood
Rubber bands
Rubber feet
Here is picture of the set screw if its called something else. I just happen to call it a set screw, not sure if that is its actual name at time of writing this. The set screw is tiny and requires the use of a 1/16" hex wrench to screw it.

Tools
You really don't need all these. You can do without some.- Pencil
- Measuring Tape/Ruler
- Combination Square
- Saw
- Drill
- Drill Bits
- Scissors
- Socket wrench
- Small Pliers
- Sand Paper/File
- Clamp
- Pipe Cutter
Rod Chuck Mount
This part may vary on the type of shaft your motor has, but the principle is the same. You need some way to attach the rod chuck to the motor. My motor has a 'D' shaped shaft. The object here is to have the plastic spacer slip snugly over the shaft and have the set screw hold the spacer in place by applying pressure to the flat portion of the shaft.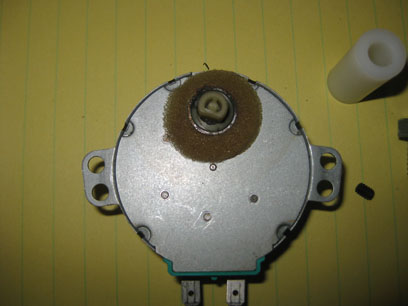
First, sand or file 1/4 to 1/2 the thickness of spacer on one side flat. This is to make the spacer easier to hold in a clamp and makes drilling the set screw hole much easier. Don't sand too much off, you want a good amount of material to hold the set screw in place.
The inner diameter of the spacer was a tad bit too small for the shaft on the motor. That was good because the spacer could be drilled to the correct size for a nice snug fit.
Mark where the set screw would be touching the middle of the shaft and drill a hole for it on the flat portion of the spacer.
Cut the spacer to size if it is long. The spacer was cut to the length of the motor shaft plus the length of the bolt.
The bolt to hold the mount to the rod chuck will tread into the opposite side of the set screw. The bolt I had to hold the rod chuck was a tad bit bigger than the spacer's inner diameter. I had to drill out a small portion before I could tread the bolt in.
Here is the rod chuck mount attachement with the bolt slightly screwed in.

Rod Chuck
The rod chuck can be done many ways. As I mentioned above, I went the cheap route. My friend Ross went even cheaper and used a spray can cap instead of a PVC end cap.The premise for this rod chuck is that you use rubber bands stretched across the bolts. The bands cross each other and form a nice little tic-tac-toe in the center. The rod then suspends nicely in the center square. The rubber bands provide enough clamping pressure to turn the rod as the motor turns.

Basically drill 4 holes equidistance from eachother on the side of a PVC pipe end cap.
Secure the #10 bolts in those holes with the head of the bolts inside the cap as shown in the picture.
Drill a hole in the center that will be used to attach the rod chuck to the rod chuck mount.
Here is a picture of the rod chuck with the mount attached.

Base
I just used scrap pieces of wood I had laying around. I just glued up the scraps to form the base you see below. I really didn't do much measuring, mostly just eyeballed. The only measuring was for marking the mounting holes and the center hole cutout for the rod chuck. For the most part, it was made on the fly. That is why you see tie wraps holding down the power cord. It could be nicer but as I mentioned above, this is for my cousin, so I went the cheap route.I had to add rubber feet because of the way I attached the power cord. The tie wraps created an uneven surface below. This was still a cheap route for me as I have a bunch of those stick-on rubber feet laying around.

Wiring
There really isn't much to wiring it up. I just made sure that the motor spun counter-clockwise as that tightens the screw on the rod chuck. Don't want the rod chuck to unscrew itself off.The power cord was also salvaged from the same microwave that I got the motor from. The power cord already had terminals that fit nicely on the motor. The power cord also had a grounding wire that I just hooked up to the case of the motor. Probably not needed but it makes the dryer look a bit more safer.


Final Assembly
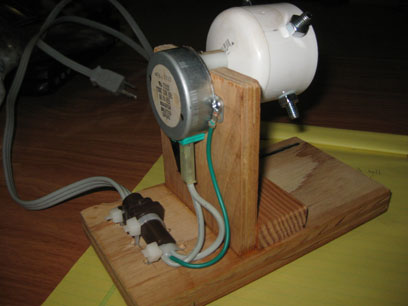
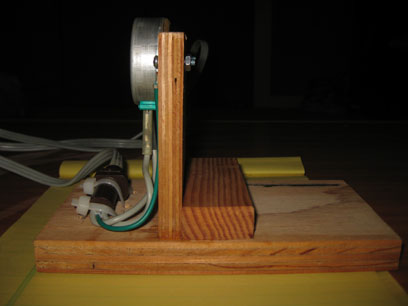
Attach the rod chuck to the motor and tighten the set screw on the mount. Here is what the dryer looks like completed.

Future Notes
Next dryer I will make the rod chuck use either plastic screws or thumb screws with protective end covers that screw into the chuck to hold the rod in place. Also, a cover over the motor and wiring with a switch would be nice. Maybe even add a timer?Thanks for reading this post.
-Bernard
Hello
ReplyDeleteYour article was very interested in me because I am trying to build a bench drying. However, I do not include the following:
"The premise for this rod chuck Is That You use rubber bands stretched across the bolts. The bands cross each other 'and form a nice little tic-tac-toe in the center. The rod Then hang nicely in the center square. The rubber bands Provide enough clamping pressure to turn the rod as the motor turns. ".
Would you have a picture with the spring set?
Thank you.
Thanks for the info!!
ReplyDeleteThanks for the info!!
ReplyDelete